detectFaces
warning
The document is a continuation of the previous document, if you have landed directly on this page then, Please read from page Get started.
What is detectFaces component ?
detectFaces component is used to detect faces from an input image.
- Description : detectFaces() takes an input(through STDIN) as image in base64 format and probability in float both wrapped in JSON format (inputJson) and returns the face information with each face probability greater than input given(outputJson). Check Input and output parameters for details.
- Parameters :
- Input(Via STDIN) :
detectFaces.stdin() << jsonDoc2Text(inputJson) << std::endl;- An inputJson String with following parameters:
- Parameter1 : Image (.jpg/.png) in base64 format
- Parameter2 : Float probability (value between 0 to 1)
- Check Step 5 to understand creation of inputJson
- An inputJson String with following parameters:
- Output(Via STDOUT) :
detectFaces.stdout() >> outputJson;- An outputJson string with following contents
- For each face
- Bounding box co-ordinates (x,y,height,width)
- Probability being face
- 5 Landmarks co-ordinates values (leftEye, RightEye, noseTip, leftMouth and RightMouth)
- int requestID
- For each face
- Check Step 6 to understand accessing above mentioned values from outputJson json.
- An outputJson string with following contents
- Input(Via STDIN) :
List of detectFaces features in shunya stack
- Customize face probability.
- Get face data.
Using detectFaces
Requirements to use detectFaces
- Shunya OS installed (supported Arm devices) or Shunya OS docker container (X86 based windows/linux devices)
- Shunya AI installed in Shunya OS.
- Shunya Video component installed in Shunya OS.
Steps to use detectFaces
- Set input video location.
- Read Video frames
- Convert cv image to base64 string
- Customize face probability
- Call API binary
- Print detected faces output
note
Run the steps given below inside Shunya OS installed (supported Arm devices) or Shunya OS docker container (X86 based windows/linux devices) terminals.
Lets take an example use case: Say we need to
- Detect all those faces which have a probability of 80% or higher in an image.
- Get JSON output of all the detected faces.
Steps are
Step 1: Set input video location
- Start with a ready to use template for detecting faces from video/image.
git clone https://gitlab.iotiot.in/repo-public/examples.git - Open the examples in a text editor and modify as per your usecase.
- We will use video compnent to set input video location in configuration file.
- Please check here, how to setup the video source path in video component.
Step 2: Read video frames
Once video path is set using video component, lets read video frames one by one.
- For CPP you will find the examples in the folder
shunya-ai-examples/indiv-components/cpp-examples/face-detection/detectFaces - Open the file
detect_faces.cpp - Code to read first video frame. If you want to read all frames one by one, put following code in while loop.
/* --- Capturing image from video using Video component --- */
captureObj src = newCaptureDevice("video-source"); /* Create capture Instance */
cv::Mat inputImage;
int32_t outIndex = 0;

/*################## Call Video Component functions ################*/
inputImage  = captureFrameToMem(&src); /* Capture one frame at a time in a loop*/

if (inputImage.empty()) {
    fprintf(stderr, "End of video file!.");
    closeCapture(&src);
    return 0;
}- For CPP you will find the examples in the folder
Step 3: Convert cv image to base64 string
- Since detectFaces API needs image in base64 string format, we will convert image from cv::Mat to base64 string.
- Code to do it
/* ---- Create cv::mat image to base64 string ---- */
std::string b64InpImg = mat2Base64(inputImage);
Step 4: Customize face probability
Modify the line to set the face probability to 80% or higher.
/* Set value to 0.8 i.e (80/100) to set the probability to 80% or higher */
float probability = 0.8;
Step 5: Call API binary
We will now call API binary by giving input image(parameter1) and face probability(parameter2) as an input through STDIN.
/* Creating inputJson adding image and face probability in it */
rapidjson::Document inputJson;
inputJson.SetObject();
rapidjson::Value inpImage;

inpImage.SetString(b64InpImg.c_str(), strlen(b64InpImg.c_str()), inputJson.GetAllocator());
/* Adding parameter1 in inputJson file */
inputJson.AddMember("inputImage", inpImage, inputJson.GetAllocator());
/* Adding parameter2 in inputJson file */
inputJson.AddMember("probability", probability, inputJson.GetAllocator());
/*################## Call detectFaces Component ################*/
subprocess::popen detectFaces("/usr/bin/detectFaces", {});
/* Calling detectFaces by passing inputJson as an input through STDIN */
detectFaces.stdin() << jsonDoc2Text(inputJson) << std::endl;
detectFaces.close();
std::string outputJson;
/* Getting output in outputJson */
detectFaces.stdout() >> outputJson;You will get output in outputJson string.
Step 6: Print detected faces output.
- Code to print the json output, got from detectFaces API.
/* ---- Printing detected faces information ---- */
rapidjson::Document detectFacesJson = readJsonString(outputJson);
if (detectFacesJson.HasMember("data")) {
    rapidjson::Value &results = detectFacesJson["data"]["faces"];
    assert(results.IsArray());
    /* Checking if face is detected or not */
    if(results.Size()>0){
    /* Reading from json file and add it in the structure */
        for (rapidjson::SizeType i = 0; i < results.Size(); i++) {
            // Printing detected faces values
            std::cout<<"\nFace"<<std::to_string(i)<<": ";
            std::cout<<"\nFaceID: "<<results[i]["faceId"].GetString();
            std::cout<<"\nFace probability: "<<results[i]["confidence"].GetFloat();
        }
    }
    else{
        std::cout<<"\nNo face detected.";
    }
}
else{
    std::cout<<"\nThere is no data member in json";
}
Run ready to use example.
Run example by yourself.
git clone https://gitlab.iotiot.in/shunya/products/shunya-ai-examples.git
cd cpp-examples/face-detection/
mkdir build && cd build
cmake ../
make
./faceDetectCppRunning the codes will print the JSON output on the terminal (to STDOUT).
For Example:
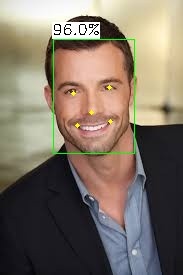
Lets say the input image is
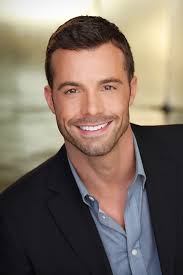
Input JSON is
{
    "inputImage": "4h32e898473urmcrkd947ryuemcc3x21j98k09754ycmx1k030i1d98754yn==",
    "probability": 0.8
}Then the JSON output is
{
    "apiVersion": "1.2.0",
    "requestId": 1606318527,
    "data": {
        "faces": [{
            "faceId": "face0",
            "boundingBox": {
                "top": 125.00978088378906,
                "left": 124.74224853515625,
                "width": 59.70306396484375,
                "height": 71.89865112304688
            },
            "confidence": 0.9994653463363648,
            "landmarks": [{
                "type": "pupilLeft",
                "x": 140.8665008544922,
                "y": 149.56112670898438
            }, {
                "type": "pupilRight",
                "x": 167.63665771484376,
                "y": 150.40902709960938
            }, {
                "type": "noseTip",
                "x": 153.38809204101563,
                "y": 161.689208984375
            }, {
                "type": "mouthLeft",
                "x": 141.44529724121095,
                "y": 174.52609252929688
            }, {
                "type": "mouthRight",
                "x": 164.7596893310547,
                "y": 175.16357421875
            }]
        },
        ],
        "image": "/e98239u9r93ynm9rfumu02398r8umc9ejmrc8ew0r374y8uhmcwe,=="
    }
}
Understand this component with an example (ready to use code)
This is an example for face-detection and here we will be using 2 components: detectFaces and drawFaces
Check this ready to use example in c++
Download the code
git clone https://gitlab.iotiot.in/repo-public/examples.git
cd example/shunya-ai-examples/cpp-examples/face-detectionIn this folder there is a file, face_detect.cpp
Using video component for capturing images from video
/* --- Capturing image from video using Video component --- */
captureObj src = newCaptureDevice("video-source"); /* Create capture Instance */
cv::Mat inputImage;
int32_t outIndex = 0;

/*################## Call Video Component functions ################*/
inputImage  = captureFrameToMem(&src); /* Capture one frame at a time in a loop*/

if (inputImage.empty()) {
    fprintf(stderr, "End of video file!.");
    closeCapture(&src);
    return 0;
}Using detectFace component
/* ---- Create Input JSON ---- */
     std::string b64InpImg = mat2Base64(inputImage);
     rapidjson::Document inputJson;
     inputJson.SetObject();
     rapidjson::Value inpImage;

     /* Set face detection probability */
     float probability = 0.8;

     inpImage.SetString(b64InpImg.c_str(), strlen(b64InpImg.c_str()), inputJson.GetAllocator());
     inputJson.AddMember("inputImage", inpImage, inputJson.GetAllocator());
     inputJson.AddMember("probability", probability, inputJson.GetAllocator());
     /*################## Call detectFaces Component ################*/
     subprocess::popen detectFaces("/usr/bin/detectFaces", {});
     detectFaces.stdin() << jsonDoc2Text(inputJson) << std::endl;
     detectFaces.close();
     std::string detectFacesOut;
detectFaces.stdout() >> detectFacesOut;Using drawFaces component
rapidjson::Document detectFacesJson = readJsonString(detectFacesOut);
if (detectFacesJson.HasMember("data")) {
    rapidjson::Value &results = detectFacesJson["data"]["faces"];
    assert(results.IsArray());
    if(results.Size()>0){
    /* Reading from json file and add it in the structure */
    for (rapidjson::SizeType i = 0; i < results.Size(); i++) {
        // calling drawFaces
        rapidjson::Value &drawFacesjson = detectFacesJson["data"];
        rapidjson::Document inDrawface;
        inDrawface.SetObject();
        inDrawface.AddMember("data",drawFacesjson,inDrawface.GetAllocator());
        subprocess::popen drawFace("/usr/bin/drawFaces", {});
        //std::cout<<"\nprinting drawFace input: "<<jsonDoc2Text(inDrawface);
        drawFace.stdin() << jsonDoc2Text(inDrawface) << std::endl;
        drawFace.close();
        std::string drawFaceOut;
        drawFace.stdout() >> drawFaceOut;
        //std::cout<<"drawFaceOutput:"<<drawFaceOut;
        rapidjson::Document drawFaceOutJSON = readJsonString(drawFaceOut);
        std::string b64Img(drawFaceOutJSON["data"]["image"].GetString(),
                           drawFaceOutJSON["data"]["image"].GetStringLength());
        cv::Mat image = base642Mat(b64Img);
        cv::imwrite("drawnFace.jpg",image);
        std::cout<<"\nImage Stored !";
    }
}
else{
    std::cout<<"\nThere is no data member in json";
}Run code by yourself
mkdir build && cd build
cmake .. && make
./faceDetectCpp- You will get a new image stored in system.